This section describes the actual steps you should follow to create a deployable Fire application.
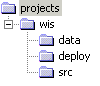
The first step in creating a Fire application is to create a project directory to hold all files associated with a project.
Note: Directory names here are suggested not mandatory. We use / for the directory separator.
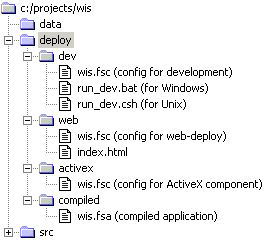
Example: If you were building the Widget Information System in your c:/projects directory, your project directory structure would look something like this:
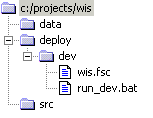
You will commonly want to build your application in stages, and test it as you build.
The best way to do this is to set up a configuration file called wis.fsc. This typically would contain just 3 lines:
#APPURL=c:/projects/wis/src
#APPNAME=wiss
#APPVERSION=1.0
This should reside in the /deploy/dev subdirectory, and kept away from your application source.
Later, when you have something to test, you can run the application in one of 2 ways:
Your file hierarchy will now look something like this:
If you prefer to use xml, a .xml file may be used instead of .fsc, e.g.
<?xml version="1.0" encoding="ISO-8859-1"?>
<!-- Wiss RunTime Configuration -->
<FireApp>
	<AppName>wiss</AppName>
	<AppURL>c:/projects/wis/src</AppURL>
	<AppVersion>1.0</AppVersion>
</FireApp>
This file would be named wis.xml , and in our subsequent examples wis.xml would replace wis.fsc.
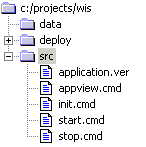
The following source files are required in all WAM-invoked Fire applications, as the Fire (WAM) Application Manager references them:
They should reside in the /src directory.
Note: The default file extension for Fire source code files is .cmd>.
init.cmd - Initialize the application.
This is called by WAM to set up the application’s environment. This macro should:
- Creating a controlling atable if it does not already exist. We shall call it wis, giving it the same name as application but this is not necessary, e.g.
if (exist(wis)) return
atable wis
- Create any identifiers whose values need to be passed to the application by the .fsc configuration file, e.g. a database connection which may vary according to run time context
# Give them default values
string ~wis.db_prop = 'oracle'
string ~wis.db_connect = 'scott/tiger'
Once WAM has executed init.cmd, it will execute the .fsc file as a macro, enabling any run time parameters to be set. In our little example, the following line could be added to our .fsc file specifying the database connection:
~wis.db_prop = 'oracle'
~wis.db_connect = 'wis/wispassword
start.cmd - Start the application.
This is called by WAM to start the application running. This macro should:
- Check that the application is not already running. Sometimes the application may be started manually, not via an appstart command, so it is wise to re-run init.cmd and set up default values for run-time parameters in case this has happened, e.g.
# Do we have an init.cmd ?
if (fexist(@wis/init.cmd)) exec @wis/init
You can create applications without an init.cmd, for example if you never have any run-time parameters. In this case the setting up of the controlling atable could be done in start.cmd instead of init.cmd.
- Setting up variables, functions and procedures used by the application. This is typically done by calling another macro for encapsulation purposes, e.g.
exec @wis/setup
stop.cmd - Stop the application.
This is called by WAM to terminate the application. This macro should:
- Close any application windows which might still be open.
- Clean up any objects created by the application, e.g. close databases, channels etc.
- Removing the application identifier storage table (atable), e.g.
if (exist(wis)) delid wis
appview.cmd - Make the application visible (i.e. display the user interface).
This is called by WAM and is most useful in web-deployed applications, as you can detect when users page in or out of your application and take some action if you need to. The macro is used in all deployment models and should:
- Call the appropriate source code file to create the user interface. In the case of web or ActiveX deployment, this will include passing parameters to define the container window (e.g. browser window or ActiveX control window)
application.ver - Identify the application version.
This is used by the WAM to determine whether or not a new version needs to be downloaded when a user accesses the application. Whenever a new build of an application is made, the version number in this data file (and also in any .fsc configuration files) should be bumped up. An example file might contain:
wis 1.0 wis
Your application /src directory structure will now resemble this:
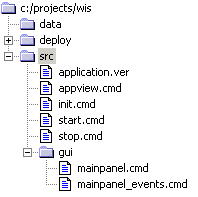
You need to define a user interface for your application. This is almost always a panel window that contains a combination of other windows and GUI controls. It is common to create a sub-directory /gui to contain the user interface code. This is particularly useful where an application has a number of different user interfaces (e.g. standard and ActiveX component), or a more complex multiple-window user interface.
The user interface needs to take parameter arguments to tell it about container windows (for embedded windows), and width and height. The panel should size itself according to the supplied width and height parameters, which will be passed to it by the appview.cmd macro. In the event of a size not been supplied, e.g. during development where neither web nor ActiveX deployment is active so a container size is not available, the code can check the deployment and set a default size, e.g.
# deployment: standard, browser or activex
if (deployment == 'standard') {
    width = 500
    height = 300
}
The contents of a typical appview.cmd macro would be as follows:
args APPVIEW=string
args APPVIEW_MODE = numeric
args width=numeric
args height=numeric

# Test for application being shut-down during start-up
unless (exist(wis)) return

unless (appview) appview='mainpanel'

# Only one view in this application 'MAINPANEL'.
scope = wis
switch appview_mode {
    case APPVIEW_CREATE: {
    # First time ? Create a mainpanel variable to keep
    # a handle on the main gui window
        unless (exist(mainpanel)) window mainpanel
        unless (mainpanel) {
            if (deployment == 'standard') {
            # Running the source (development mode)
                width = 500
                height = 300
             }
        # The mainpanel macro should create  the gui window
        # and assign it to the window  variable "mainpanel"
            exec @wis/mainpanel(mainpanel,appview,width,height)
            mainpanel.visibility = true
        }
        else {
        # If the window exists and this is called again then it
        # is typically because the window was embedded (ie Browser )
        # in an external window and that had been destroyed and
        # re-created.
        # Nothing to do - but it might be useful to know it has happened.
            tell <'Application View has been re-parented.'>
        }
     }

    case APPVIEW_EXPOSE: {
    # This is called when an embedded window has become visible.
        tell <'Window is now visible'>
    }

    case APPVIEW_HIDE: {
    # This is called when an embedded window has become invisible.
        tell <'Window is now invisible'>
    }

    case APPVIEW_DESTROY: {
    # This is called when an embedded window handle has become invalid.
        tell <'External Window Reference is no longer valid'>
    }

    case APPVIEW_RESIZE: {
    # This is called when an embedded window has been resized.
        if (mainpanel) {
            tell <'Window has been resized:',width,height>
            manipanel.outrect = <0,0,width-1,height-1>
        }
    }
} # End switch
The panel definition is typically written in a macro named mainpanel.cmd. It is common for the panel to contain GUI controls (e.g. buttons) which have some behavior associated with them (e.g. what happens when the user clicks a button). These event handlers are typically written in a macro named mainpanel_events.cmd.
Your application’s /src directory structure will now look like this:
There are two main sources of data for Fire applications:
For example, let’s assume that your application is a web-based retail outlet browser for a corporation. The application may present the user with a map of the world with symbols indicating locations of retail outlets, and allow the user to select a particular office and show them a digital photo of the office. The digital photos may be supplied as JPEG image files. A relational database may hold the office locations (in latitude/longitude) plus a field linking a particular location to a digital image file.
In such an example, the application needs a way to retrieve image files from a web-server and connect to a relational database across the web. Additionally, the location of both of these data sources may change over time, so ideally the data source location would be supplied as parameters to your application, rather than hard-coded. We discussed run time parameters when discussing init.cmd and .fsc configurations.
The best way to access files that are external to your application is to use an environment variable to reference the file location (i.e. directory). When Fire resolves environment variables, it is able to decipher URL’s as well as standard directory paths, making it possible for your Fire application to seamlessly access web files as though they were in a local directory. In fact, if your environment variable contains a local directory path and a URL (separated by a semi-colon), then Fire will look for the file in the local directory first, and if it cannot find it, it will download it across the web (using the URL) into the local directory. Using this approach, files will only be downloaded across the web once, after which they will be accessed from Fire’s file cache area.
When you are developing your application, you can use the /data sub-directory to hold some test-data, and set your configuration file to pass the /data sub-directory as a parameter. When you want to deploy your application on the web, you simply need to change the configuration file to point to the correct web location (URL) of your real application data.
To implement this approach in your application you should:
Note: It is quite legitimate for your application to have its own internal data files (e.g. icon images) which form an intrinsic part of the application. These internal data files are commonly put in a /data sub-directory beneath /src and are compiled into the application, but should not be confused with external data files.
Fire is able to access data servers (e.g. databases) in both traditional client-server fashion and via the web. Web-access to data servers is enabled by the Xmarc Service Broker software, which runs on a web-server and acts as a request broker between Fire applications and Fire data servers.
When developing the application, you may wish to test against a local client-server database. When preparing to web-deploy the application, you will want to switch to a web-access model. In fact, you may have some users who want a client-server application, and other users who want a web-deployed application. You may need to cater for both cases in the deployed application.
Again, the configuration file can be used to pass parameters to the application allowing it to determine at run-time which database to connect to, and how to connect to it. You need to add any parameter variables to the init.cmd file, and change your configuration file to set the parameter variables to sensible values. Finally, you need to write some code db_connect.cmd to use the parameter variables to establish a connection to your data. Database code is typically placed in a /db sub-directory in your application.
Typically, your parameter variables are:
db_prop - Sets the database proprietor used for the connection. This might be oracle or informix for a client-server database connection. In the case of connection to a remote data service via the Fire Service Broker, the proprietor is netsvcc.
db_connect - Supplies any other information required to connect to the database. In the case of client-server connections, this might be a user id and password.
(You might actually want to code these into your application). In the case of web connections, this would provide the URL for the Fire Service, including the logical service name. For more information see the FX User Guide.
At this point you need to add the functionality which is unique to your application. For example, you might add code to mainpanel_events.cmd to respond to graphic window redraw events (e.g. use the window scale to turn object display groups on or off, or even load data for the region being viewed by the window). You might add an interface definition so that your application will function as an ActiveX component. You might add some data query or manipulation functionality. What you do here will be dictated by the user requirements of your application. You can develop Fire applications in any way that makes sense to you. Here are some useful conventions, which you may find useful in developing your Fire applications:
• Define any functions and procedures in a /src/setup/functions.cmd file.
• Create a /src/classes sub-directory and define any application classes beneath it. Use separate sub-directories under /src/classes for more complex classes.
• If your application is destined to become a ActiveX component, then create a /src/activex sub-directory, and define the API in that directory. (A suggested source code file name is interface.cmd). You may also want to create a component_panel.cmd file in the /gui sub-directory, to define what the application will look like when used as an ActiveX component.
• If your application has a menu-bar, then create a /src/menu directory, with sub-directories for each top-level menu option, for example: /menu/file, /menu/edit, /menu/view, /menu/help. Then, inside each sub-directory, create a separate source code file for each menu option. (e.g. new.cmd, save.cmd, save_as.cmd, print.cmd, etc.). This approach makes locating the source code for a particular menu option very easy.
Up to this point, you have been creating and testing your application in development mode. To deploy your application, you need to compile all of the files in the /src directory of your project into a compiled Fire application library (a .fsa file). For more information, see Compiling Fire Applications.
Once your application is compiled, you can create configuration files allowing it to be deployed as a stand-alone (compiled) application, in a web-browser, or as an ActiveX control. To do this, create a separate sub-directory under the /deploy sub-directory for each deployment style, and create separate configuration files for each deployment style.
As a result, an application that was deployed in all three compiled application deployment modes, plus a development mode, would have a /deploy subdirectory hierarchy like this:
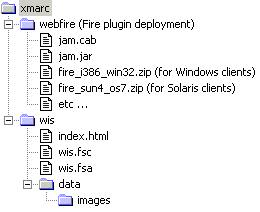
In a web-deployment scenario, your application will be placed on a web-server for distribution. This will involve copying your compiled application /deploy/compiled/*.fsa, configuration file /deploy/web/*.fsc, web page /deploy/web/index.html and /data sub-directory onto the web server. The web server should also have an Xmarc Fire webfire directory, to enable automatic updates of the Fire plug-in to client user’s browsers.
A typical web-site would have the following structure:
The URL for a client to access the WIS application using a web-browser would be:
http://www.some_company.com/xmarc/wis/index.html