This chapter describes statement flow within the Fire language.
Commands are usually executed sequentially, but there are ways of changing this by means of conditional statements, loops and command blocks, in particular within command macros, functions and procedures.
In some cases, the inclusion of new lines between statements is critical. Remember that the block begin and end characters { and } implicitly include new line characters.
Conditional statements direct Fire to perform sequences of commands as a result of evaluating a condition. They are very similar to conditions within other languages.
The if statement enables commands to be executed when a particular condition is true, or skipped if the condition is false, e.g.
if (x == 5) y = 10
This will assign the value 10 to the numeric identifier y if the value of the numeric identifier x has the value 5.
A block of commands may be executed instead of just one command, e.g.
if (x == 5) {
    y = 10
    z = 15
}
Note how we indent the commands in the command block. This conventionally makes the code more readable.
In our example we have used the == operator for equality testing. A single = is also permitted but most other languages use ==, so we advise using == to differentiate between a condition and an assignment statement.
The possible conditions for which you can test are described in detail at the end of this chapter.
Often, it is convenient to combine an if with an else to execute a command, or command block, if a condition is true, but another command, or command block, if the condition is false, e.g.
if (x == 5) y = 10
else y = -10
An unless statement may be combined with an else statement just like an if statement.
Note: No new line character is required either after the if condition or after the else. Putting one in will have no effect since blank command lines are ignored.
This statement is very similar to an if statement but enables commands to be executed if a particular condition is false, e.g.
unless (x == 5) y = 10
This will assign the value 10 to the numeric identifier y if the value of the numeric identifier x is not 5.
Just like an if statement, an unless statement may be combined with an else.
User identifiers are created to hold user-information for use within other language statements. Once they have been declared and assigned values, they may be deleted or renamed at the user’s discretion.
A switch statement is a multi-way decision that tests whether a given value matches
one of a number of possible choices. Associated with each choice is a command or
command block to be executed if a match is found. The value to be tested may be
any of the following identifier types:
numeric, string, point, time, window, channel, epointer, group, panel, menupane or
symbology.
The choices must be of compatible type. Example:
switch x {
   case 1: { y = x }
   case 2: { y = x; z = x }
   case 3: { null }
   case 4,5,6: { x = 25 }
   case na[1:5]: { x = 37 }
   default: { x = 50 }
}
In this example are several case types:
case 1: The command block is executed when x is 1.
case 2: The command block is executed when x is 2.
case 3: No action is taken when x is 3. This uses the null command which is a no-op.
case 4,5,6: The command block is executed if x is 4, 5 or 6.
case na[1:5] The command block is executed if x is one of the first 5 values in the numeric array na.
default: The command block is executed if x has any other value than the above cases.
Within a switch block, only the words case and default are permitted to begin choice statements. If the default statement is included, it must be the last choice statement. If the default statement is not present and none of the cases are satisfied, control will drop through without executing any commands.
Some other languages permit a break statement to mark the end of each case execution sequence. This may be included for readability but is not necessary, since Fire interprets the closing block character } as the case terminator.
Note: The start block sequence { after the switch line and the end block sequence } after the final choice statement must be present.
When switching on a string value, wildcards and case-sensitivity are permitted within the tests by use of command switches, e.g.
switch mystring,-u,-w {#Case sensitive + wild-carding
    case 'a*': { !String begins with a}
    case 'b*': { !String begins with b }
    case 'c*','d*': { !String begins with c or d }
    default: { null }
}
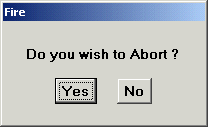
A useful conditional statement is ifyes, which displays a Yes/No question dialog for the operator to respond to. Action is then taken if the operator supplies a Yes answer, e.g.
ifyes 'Do you wish to Abort'  {
    tell 'Operation was aborted'
    return
}
This would display the following dialog:
Note how a ? has been added to the text automatically and how the Yes button is highlighted as the default button. The default button, dialog title and colors are all configurable by command switches. Consult the reference manual (ifyes) for details.
The displayed text is in the form of a single text message. If this message contains multiple component parts, e.g. identifier values, then it must be enclosed within hairpins. In addition, multiple lines are indicated by inclusion of the \n sequence within the text.
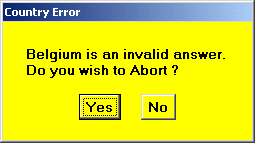
Consider another example, which also specifies a change of title and dialog color.
string mys = 'Belgium' ;# Example value
ifyes <mys,'is an invalid answer.\nDo you wish to Abort'>,\
      -tit='Country Error',-col=yellow {
    tell 'Operation was aborted'
    return
}The ifno command is similar to ifyes, but the action is performed if the operator supplies a No answer.
Loops provide ways of executing common sequences of commands repeatedly, with slight variations for each loop iteration.
It should be stressed that since Fire is an interpreted language, loops with many iterations can add a significant overhead to the performance.
The loop statement is the simplest form of loop and executes one or a block of commands a specified number of times, e.g.
loop 10; x **= y
Note the new line at the end of the loop statement.
A block of commands may be looped:
loop x {
    s &= '+'
    t &= '-'
}
This will execute the loop x times. This loop count is evaluated once only at the start of the loop, so if it is a numeric expression whose value could change because of commands within the loop, this will have no effect on the number of times the loop gets executed.
The for statement executes one or a block of commands a given number of times depending on the value of a loop variable. The statement contains a loop variable (a numeric identifier) which is given a start value, a finish value and (optionally) an increment.
The command block is executed repeatedly while the value of the loop variable is less than or equal to the finish value. At the end of each pass, the loop variable is incremented by its increment.
If increment is omitted from the statement, the value of 1 is assumed, e.g.
for x=1,10; array[x] = 5 * x
Note the new line at the end of the for statement.
A block of commands may be looped:
for x=0,20,5 {
    y = x*7
    z = x*9
}
The start, finish and increment values are evaluated once only at the start of the loop, so if they are numeric expressions whose values could change because of commands within the loop, the loop parameters remain unchanged.
A negative increment is permitted, in which case the loop will continue to execute while the loop variable is greater than or equal to the finish value.
If the loop variable does not exist, it will be created automatically as a numeric identifier with local scope.
A while statement enables commands to be continually executed while a particular condition is true, e.g.
while (sqrt(x) < 5) x = x + 3
And of course a block of commands may be used instead of just one command:
x = 0; while (x < 5) {
    x = x + 1
    y = y * sqrt(x)
}Note: When issuing Fire commands interactively from the keyboard in development mode, all commands to be executed within the while block must be on the same line.
This statement, similar to a while statement, enables commands to be repeatedly executed until a particular condition is true ( or to put it another way, while the condition is false), e.g.
until (sqrt(x) >= 5) x = x + 3
Similarly, a block of commands may be used:
x = 0
until (x >= 5) {
    x = x + 1
    y = y * sqrt(x)
}Note: Again, when giving commands from the keyboard in development mode, all commands to be executed within the until block must be on the same line.
This sequence is similar to the while statement but is different in that the commands are executed at least once, and then re-executed only if the while condition continues to be true.
x = 0
do {
    x = x + 1
    y = y * sqrt(x)
} while (x < 5)Note: When giving commands from the keyboard in development mode, all commands to be executed within the do block, and the while statement itself must all be on the same line.
This sequence is similar to the do ... while sequence in that the commands are always executed at least once, but then re-executed only if the until condition continues to be false.
x = 0
do {
   x = x + 3
} until (sqrt(x) >= 5)
The identloop statement permits a sequence of commands to be executed on a range of target identifiers. For example, consider a requirement to strip white space from a range of string identifiers:
identloop str*,-ty=string {
    ident = nowhite(ident)
}
This will execute the loop for all local string identifiers whose name begins with str. Note how the -ty switch restricts the loop to string identifiers.
During execution of the loop the special generic system identifier named ident points to the current loop identifier.
Fire's spatial facilities include the ability to build a database of graphic entities. These entities can be grouped according to application requirements and typically operations need to be done on all entities in a group
The gloop statement permits a sequence of commands to be executed on all entities within a group. For example, consider a requirement to replace all polygon entities of area less than 10,000 square meters with green rectangles:
# Create a group of all polygons
group ga = polygon_filter % (area < 10000)
gloop ga {
# Create a polyline of the required size
    rect this.extents,-ls=green
# Delete the polygon entity
    kill this
}
During execution of the loop the special epointer system identifier named this points to the current entity. In our example, the mbr (maximum bounding rectangle) of this is used to construct each new rectangle, and the polygon entity is then deleted. At the end of the loop the group ga will be empty, having had all its members removed
Note: There are other commands which are more efficient than gloop for manipulating group contents. Both filter and rule identifiers are available specifically for this purpose and should be used where possible.
The break command, as its name suggests, enables premature termination of a loop. It will cause any commands remaining in the loop to be skipped, and command processing will recommence at the first command after the loop. Consider an extension to the previous example:
gloop ga {
    if (this.area < 100) {
        ifyes 'Area < 100 found. Do you want to abort'; break
    }
# Create a polyline of the required size
    rect this.extents,-ls=green
# Delete the polygon entity
    kill this
}
Here, when an entity of area less than 100 is encountered, the operator is presented with an option to abort the loop.
The continue command is similar to a break in that it causes a jump to the end of the current loop. Unlike the break however, the loop continues, e.g.
gloop ga {
    if (this.area < 100) continue
# Create a polyline of the required size
    rect this.extents,-ls=green
# Delete the polygon entity
    kill this
}
Here, we just skip the processing of entities whose area is less than 100. This of course could have been achieved more elegantly by inverting the test and enclosing the rest of the loop code within a command block, but it demonstrates the use of continue.
There are several references in the previous sections to macros. A macro is a sequence of commands held in an external file. By using the command exec, the commands within the macro are executed sequentially, e.g.
exec myfile
This will execute the commands in a text file named myfile.cmd.
A procedure is a sequence of commands held in an atable like any other identifier, e.g.
procedure doit = {
    tell 'Hello World'
}
# Execute the procedure doit
A function is similar to a procedure but returns a value to the caller via an identifier named funcval, e.g.
string_function osinfo = {
# Returns a string concatenation of the machine architecture
    funcval = machine & os_name
}
# Execute the function tell <'Machine architecture:',osinfo()>
Commands within macros, procedures and functions (known collectively as command frames) are executed sequentially but there are occasions when you wish to change the flow by jumping about within the code. The following commands are available:
The return command is used to leave a command frame, and to return to its caller at the statement following the one which initiated the command frame.
The exit command is similar but (within macros only) may be given a parameter, a numeric expression, to indicate multiple exits up the macro-calling hierarchy, e.g.
exit 3
If the parameter is omitted, a return, i.e. one exit only, is executed.
When input is from the keyboard in development mode, both the exit and return commands are ignored, unless in interrupt mode in which case an exit command will close the currently interrupted macro and revert permanently to keyboard input.
The end command terminates Fire. When used in development mode, a confirmation dialog is displayed to check whether you really mean it.
An attempt to close the monitor window will also perform the same function.
The top command is a convenient way of moving control to the first command of the current macro, thus re-executing it. In all other contexts it has no effect.
We did not really want to include these within the language, but there are some valid cases for their use.
The goto command effects a move of statement control to another statement in the current command frame. Label identifiers mark the destination positions.
Labels are not defined by assignment like other identifiers but merely by their occurrence, being prefixed by a $ at the beginning of a line. A label is a name comprising up to 48 alphanumeric or underscore characters, e.g.
$error_processing
Everything else on a command line after the label name is ignored.
The goto statement requires the name of the label without the $, e.g.
goto error_processing
A label can be anywhere in a command frame subject to the following constraints:
A label must be the first element on a command line.
A label must be prefixed by a $.
A label must be in the outermost command block of the command frame, so labels within command blocks, i.e. within { and }, are not permitted.
Labels have local scope, although this fact is of limited use. Labels cannot be deleted specifically but are removed automatically on exit from the command frame. A label occurring twice in the same command frame will produce undefined results.
Parameters are values or identifiers which can be passed to command frames (macros, procedures and functions). Also known as arguments, parameters are given their own names within the command frame and must be declared on the first line of the command frame, so that they can be evaluated when the command frame is executed.
Within the definition of a sub-frame, parameters are declared by the args command at the beginning of the sub-frame. Consider this macro:
# mymacro.cmd
args a=numeric, b=numeric, c=numeric
tell a**a + b**b + c**c
return
In this context the parameters are referred to as dummy parameters. Dummy parameters do not have to have the same names as the actual parameters used in the calling command frame, in fact they usually don’t since the whole point of a sub-frame is for it to be executable with different sets of parameter values. Nor do dummy parameters have to be declared in one args statement, they can be arranged on multiple statements, like this:
# mymacro.cmd
args a=numeric
args b=numeric
args c=numeric
tell a**a + b**b + c**c
return
The args statements must be the first executable statements within a command frame. Note: Comments are not executable.
The number of actual parameters passed to a command frame cannot exceed the number of dummy parameters expected by the frame. It can be less however:
exec mymacro(44,10)
This is a perfectly acceptable way of calling our example macro. In such cases when the sub-frame analyses its parameters list, but finds missing ones (in this example c the third parameter), null values will be assumed. A null value will be interpreted according to the expected parameter type, in this case a numeric will use 0. Thus the command: exec mymacro(44,10) will be executed as: exec mymacro(44,10,0).
In the above example macro the parameters are passed by value, and any change to the value of a dummy parameter during execution of the macro is a local change only. The value of the actual parameter in the calling command frame will not be changed. In fact dummy parameters, when passed by value, are resident in the macro's local atable and remain until the end of the macro.
Parameters are checked on entry to the command frame, and failure to match the type of an actual parameter with its corresponding dummy parameter will result in an error message and an abort of the command frame.
Some identifier types, e.g. symbology identifiers, cannot be passed by value but must be passed by address. This are discussed in a later section.
Command frames do not have to have parameters, and in such cases may be called with or without a pair of parentheses, e.g.
exec macro2()
Conventionally, procedures or functions without parameters are called with empty parentheses to distinguish the language construct from a non-command frame construct.
Arrays of values can be passed to command frames. Such arrays can be array names or array expressions within hairpins, e.g.
string ss[]
dir *.cmd,-os=ss
exec numbytes(ss)
In this example, numbytes.cmd might be a macro to print the total size in bytes of an unspecified number of disc files:
# numbytes.cmd
args names=string[]
numeric total
for i=1,names.alength {
    total += fsize(names[i])
}
tell <’Byte total:’,total>
The args statement in the macro declares the dummy parameter names as a string array of variable length. Its length is established at execution time by the array length of the actual parameter passed to it. As the parameter has been passed by value, the new local array names is completely independent of the array in the calling command frame. It can have values changed or its array length modified without any effect on the actual parameter in the calling frame.
We could call this macro with an array expression instead of an array identifier, e.g.
exec numbytes(<'file1.dat','file2.dat'>)
In this last example macro, the array length of the dummy parameter is variable, but we can specify that we require an array of fixed length to be passed, e.g.
# parentage.cmd
args parents=string[2]
tell <'My parents are',parents[1],'and',parents[2]>
This macro must be called with an array of at least two elements. Any fewer will produce an error such as "Wrong no. of values for this parameter". Any more and the extraneous values are ignored. Even though an array of fixed length is expected to be passed, the array parents, created in the macro's local atable, is made variable length with an initial length of 2.
Passing by address means that an actual parameter passed to a command frame may have its values changed within the frame. This is indicated by prefixing the dummy parameter’s type with a & character:
args pp=&point
Any changes to the dummy parameter in the command frame will be applied to the actual parameter in the calling command frame. The dummy parameter will have the same array characteristics as the actual parameter; fixed or variable, and array length. Adding [ ] to the type has no effect.
Parameters passed by address are referred to within the command frame as indirect identifiers, because any reference to the identifier has to be re-directed to refer to the identifier in the calling (or parent) command frame.
Consider an example similar to that in the previous section whereby a list of file names is presented to a macro. The macro then amends the list to contain only files whose sizes are less than 500 bytes, and returns the count of the amend list in a numeric identifier. Note how both parameters: the list of file names and the numeric identifier to receive the count, are passed by address:
# min500.cmd
args names=&string, count=&numeric
for i=names.alength,1,-1 {
    if (fsize(names[i]) >= 500) delid names[i]
}
count = names.alength
The string array names has both its contents and array length amended during execution of the macro. The numeric identifier count just gets its value set.
This macro might be called as follows:
dir *.cmd,-os=ss
numeric total
exec min500(ss,total)
It is not possible to pass literal value parameters to command frames expecting by-address parameters. The following would produce an error:
exec min500(ss,5)
Some complex identifiers, e.g. user structures and symbology identifiers, which are discussed in later sections, are always passed to command frames by address, thus making the & prefix redundant, although for readability we advise its inclusion.
Sometimes it is required to call a command frame multiple times where one of the parameters is a different identifier type each time. The dummy parameter cannot be defined as a specific type since this can vary. In such cases, the dummy parameter is declared as generic, and an actual parameter of any type can then be passed to it, but not a literal value.
Consider an example where an operation needs to be done on structure members of the same name in structures of different types. Perhaps a census application may require a structure defining a city:
atable census
structure ~census.town {
    string county
    numeric population
}
and a structure defining a county:
structure ~census.county {
    string state
    string towns[]
    numeric population
}
A macro could be written to perform some sort of analysis on the population irrespective of whether it was a town or a county:
# analyze.cmd
args s=generic
numeric n = s.population
# more stuff ...
The meat of the analysis (...) has been omitted.
The macro could then be called passing an identifier of type ~census.town or ~census.county.
Generic parameters are always passed by address.
User functions and procedures are similar to macros in that they are sequences of commands, but they differ from macros in that they are held in memory (as function or procedure identifiers) rather than on file, and can return a value to the caller.
A function is defined using one of the available function commands:
numeric_function, string_function,
point_function, etc.
Functions do not have to return a value. They can execute just like macros to run a common sequence of commands. When used in such a form, a simple reference to the function name on a command line will cause the function to be executed. As a rule and for the sake of readability such a function is generally declared as a procedure. The commands function and procedure are synonymous with numeric_function.
A simple example of a function:
numeric_function power4 = {
    args x=numeric
    funcval = x ** 4
}
As can be seen, functions can have parameters just like macros. The value of the function is returned to the caller by setting the value of the generic identifier funcval anywhere within the function.
A function is executed simply by reference to its name, e.g.
numeric y = power4(y-1)
In actual fact, the generic identifier funcval is an array of variable length thus allowing multiple values to be returned to the caller. This array is initially of length 1 and initialized at the beginning of function execution with a null value, i.e. 0 for numeric functions, "" for string functions, (0,0,0) for point functions, and so on.
An example of a function returning an array of values:
string_function breakup = {
# Break up a string
# Returns one string per character
    args s = string
    funcval.alength = len(s)
    for i=1,len(s) {
        funcval[i] = s%i
    }
}
The above example uses several language features we have not met before:
The .alength element references
the length of an identifier array.
The system function len returns the length of a string identifier.
The operator % enables access to individual characters within a string.
The following user functions types are permitted:
numeric_function
point_function
string_function
time_function
channel_function
window_function
group_function
epointer_function
component_function
panel_function
menupane_function
projection_function
Polling is the state when execution of commands within a command frame is suspended while Fire waits for events. Typically such events are actions resulting from operator interaction with on-screen windows and menus, but also include external actions such as timers, user interrupts, and events on communication channels.
During polling, when Fire receives an event it executes a procedure triggered by that event. Such procedures are known as callbacks or event handlers and are themselves command frames. Polling is suspended while a callback is being executed, then Fire continues polling for the next event.
Only when polling is stopped will Fire continue processing the original command frame in which polling was initiated. Polling is kicked off by the poll command, and stopped when there are no more windows waiting for events, or when the poll is forcibly terminated, e.g. by a repoll break command.
The poll command begins a poll loop.
At the start of a Fire session, and after any start-up macro has been executed, Fire immediately starts polling for events. If there are no windows created by the start-up macro then Fire will wait there indefinitely with nothing to do, since there will be no events for it to handle.
For this reason Fire is usually given an application to execute on start-up. This can be supplied as a command-line parameter to Fire, or can be initiated within a start-up macro. Within the application, the usual sequence of events is that a window is created and then the poll command is issued, after which Fire should have events to process.
When operating in development mode the application is fire.mxa, initiated by the command start fire. This special application automatically starts polling from the command line within the monitor window as well as from any new windows which may be added subsequently. Any command typed at the command line prompt is handled as a keyboard event and executed. In development mode polling will only stop, and Fire will only exit when an end command is issued.
When not in development mode, an application started by a command-line parameter must issue a poll command at some stage, typically as the last command after setting up the application environment. If it does not, then processing will drop straight through and Fire will exit since it has not been told to wait for events.
To sum up, the poll command, without parameters, tells
Fire to wait for events.
This is the simple case of polling, but there is often a requirement to restrict
the operator to use one, or sometimes more than one, specific window. This is
known as "modal polling", and will suspend execution until it is told to stop,
or until the specific window or windows no longer exist.
An example of modal polling might be:
poll mywin
This will begin a polling loop and stay in it until the loop is broken. While in this loop only on-screen, and external, events from mywin will be accepted. Breaking out of a polling loop is discussed in the next section.
When operating in development mode, commands may be issued from the keyboard during a polling loop. This can be suppressed if required to simulate a run-time environment by use of the -no_kb switch:
poll mywin,-no_kb
In a typical application the window to be polled is a panel window, with one of more sub-windows. To enable events to be received from these subwindows, a -sub switch is available. Without the -sub switch, Fire ignores any events raised on subwindows.
During a polling loop, any new top-level windows created, for example temporary dialog windows, are automatically added to the list of windows to be polled.
The repoll command may be issued within a polling loop, typically from within a callback, to execute a command which requires the scope of the command frame containing the poll command. Once the command has been executed, the polling loop continues waiting for more events.
How do we break out of a poll loop?
This can be done by destroying the window,
since Fire will automatically come out of the polling loop when the window (or
windows) it is polling on (in our previous example mywin) no longer exists.
The other way of getting out of a polling loop is to issue the repoll break command from within a callback.
How does this work ? The repoll command tells Fire to execute a given command and then continue polling, but the command we are asking it to execute is break, so this has the effect of breaking from the loop. The example in the next section should demonstrate how this works.
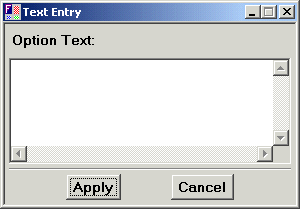
Consider an application where the user is required to provide multiple lines of text as input into some other macro. They are given the option of entering valid data or of cancelling the operation. First a window is created to permit the user to enter values:
window mywin = wpanel {
    label 'Option Text:',-j='l'
    t: text -row=5
    separator
    row {
        apply: button 'Apply'
        gap 50
        cancel: button 'Cancel'
    }
}
Then to restrict input to that window, the poll command is used:
poll mywin
This will work fine, but the only way to get out of the polling loop is to destroy the window by choosing the Close option in the window manager menu activated from the window's title bar. If we do not do this the window will stay displayed forever, or at least until the next power cut.
It is therefore better to end the polling loop by providing suitable window callbacks. We will prevent the user from deleting the window from the menu bar with the following callback:
mywin.delete = {
    !Use the Apply or Cancel button
    bell
}
Because this callback does not contain an explicit wdelete command, any request to delete the window is denied, so we must devise an alternative way of breaking the polling loop.
The other way of stopping the loop is to issue the repoll break command. We can supply callbacks for the Apply and Cancel buttons to achieve this:
mywin.apply.exec = { repoll break }
mywin.cancel.exec = { repoll break }
We shall change these later adding more application functionality. Our window should look something like this (the wpanel command, used to create the window is discussed in detail in later chapters):
The operator is given the opportunity of typing text into the text box. Clicking the Apply button will submit the text for further processing. Clicking the Cancel button will abort the operation.
We can now turn the whole thing into a usable string function, returning to the caller the text entered by the operator:
string_function get_text = {
# Create the window
    window mywin = wpanel -no_num,-tit='Text Entry' {
        label 'Option Text:',-j='l'
        t: text -row=5
        separator
        row {
            apply: button 'Apply'
            gap 50
            cancel: button 'Cancel'
        }
    }

# Ignore delete requests invoked via the window manager
    mywin.delete = {
        !Use the Apply or Cancel button
        bell
    }

# Break out of the loop on Apply
    mywin.apply.exec = { repoll break }

# Delete the window on Cancel
    mywin.cancel.exec = {
        args w=window
    #  Reset the delete callback (otherwise we can't delete it)
        w.delete = null
    #  Now delete the window (this will break the polling loop)
        wdelete w
    }

# Poll and wait  ...
    poll mywin

# If the window is still valid, this means they clicked Apply
    if (mywin) {
    # Return whatever text was entered
        funcval = mywin.t.text
    # We can now delete the window
        mywin.delete = null
        wdelete mywin
    }
#  ... otherwise they cancelled, so return a 0-length array
    else funcval.alength = 0
}
Note: We have mentioned already that the default state of Fire on start-up is for polling to be turned on as soon as any initial macros have been executed. There is often the requirement to poll all on-screen windows while keeping control within a macro, similar to the poll in our example but with the difference that all on-screen windows should be polled instead of restricting the poll to one window. This can be achieved by using the poll command without a window parameter, but care should be taken that there is at least one repoll break command in a callback otherwise it will never be possible to exit from the poll loop.
When running in development mode it is useful to know how the Fire code is performing, e.g. checking identifier values, stepping through the code etc.
Several commands are available to stop the flow temporarily. Most of these commands are no-ops when running in runtime mode.
Some of them allow you to drop down into Interrupt Mode, in which command frame processing is temporarily suspended allowing you to type commands from the keyboard. Later, you can resume command frame processing by issuing an exec command.
The interrupt command interrupts the current command frame temporarily and enters
Interrupt Mode. Commands can then be issued from the keyboard until either:
• a return to the command frame is required, in which case an exec command
without parameters can be typed, or
• an abort of the macro is required, in which case an exit command can be
typed.
While running in interrupt mode, the scope of identifiers is that of the interrupted command frame, to enable values to be inspected and possibly manipulated. Interrupt mode is only available when running development mode. At all other times an attempt to interrupt a command frame is ignored.
The pause command has a similar effect to the interrupt command but displays a prompt on the display to permit the operator to choose whether or not to interrupt the command frame, e.g.
pause 'Press i to interrupt'
The prompt can be a user-defined message or a default system message. In response to the prompt, the operator can type the following keys to proceed in different ways:
C Continue execution of the command frame
E Continue execution of the command frame but with command echoing turned on
I Enter interrupt mode. The situation is then similar after an interrupt command.
S Continue execution of the command frame but in stepping mode
Command echoing and stepping mode are discussed in the next sections.
To monitor how Fire code is behaving, there is a feature known as command echoing. When this is enabled, all executing Fire commands are echoed to the monitor before they are executed. This is assuming that permission to do this has been granted by the command frame.
Echoing is turned on by setting the system numeric identifier echoing, e.g.
echoing = on ;# or ...
echoing = 1
Echoing can be turned off by a similar assignment:
echoing = off  ;# or ...
echoing = 0
It can also be set via the Debug menubar button in the monitor window.
Command echoing is disabled when entering commands from the keyboard, since these commands are echoed to the monitor log by default.
Macros can be executed with echoing turned on by use of the -e switch:
exec mymacro,-e
The command stepping feature (aka stepping mode) is similar to command echoing in that macro commands are monitored as they are executed. During stepping however there is a pause before each command is executed to allow the operator to take particular action.
Stepping is turned on by setting the system numeric identifier stepping, e.g.
stepping = on ;# or ...
stepping = 1
Stepping can be turned off by a similar assignment:
stepping = off  ;# or ...
stepping = 0
It can also be set via the Debug menubar button in the monitor window.
The form of the pause issued by the stepping mechanism is as follows:
{ command } A/B/C/E/I/N/O/P/S >
A single character key press is then required from the operator to indicate which action should be taken prior to command execution:
A Abort. Exit the command frame and return to keyboard input without executing the command.
B Break. Execute a break command, so that control within the command frame will jump to the end of the current command block or loop.
C Continue. Execute the command normally.
E Continue with echoing. Turn stepping off, turn echoing on, and continue normally.
I Interrupt. Interrupt the command frame and enter interrupt mode. A subsequent return to the command frame can be made by an exec command entered from the keyboard.
N Execute. If the command is an execute macro call (exec), turn stepping off for the duration of that macro only.
O Stepping Off. Continue execution with stepping turned off, i.e. resume normal processing.
P Repoll. Execute a repoll command, to continue command polling.
S Skip. Skip the command, i.e. do not execute it. If the command is a block start ({) the whole command block will be skipped.
Any other typed character will be interpreted as a C.
Stepping is disabled when entering commands from the keyboard, and command echoing is turned off when stepping is on. In addition, for some callbacks where timing is critical, e.g. window tracking handlers and timers, stepping is automatically disabled.
Macros can be executed with stepping turned on by use of the -st switch:
exec mymacro,-st
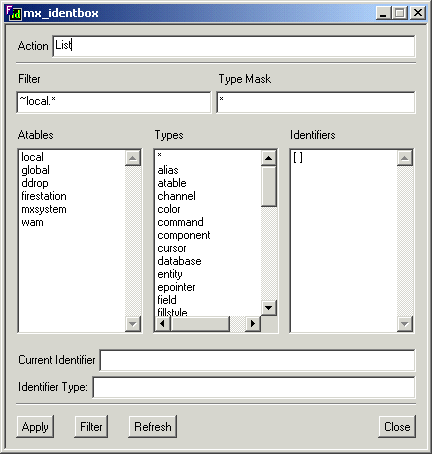
The identbox command displays a dialog for more detailed examination of identifiers, e.g.
With this dialog, you can examine the contents of atables, display identifier values and generally check the state of play.
The identbox command can also be invoked via the Debug menubar button in the monitor window.
Many of the statements described in previous sections use conditional expressions within them. A condition is a true or false value derived from one or more expressions within parentheses ( and ), e.g.
if (x > 5) break
Different types of identifier use different expressions and conditional operators when used within conditions:
A numeric value used in isolation will be evaluated as true if its value is non-zero, false otherwise, e.g.
(x)
(xarray[4])
When combined with the usual suspects of conditional operators, the appropriate evaluation will be made when comparing 2 numeric values, e.g.
(x == 5)
(x != 5)
(x > 5)
(x >= 5)
(x < 5)
(x <= 5)
Note: Because Fire stores all numerics as floating point, tests for equality between numeric values are made to a number of decimal places. This by default is 4, but can be set via the system numeric identifier cond_precision.
A string value used in isolation will be evaluated as true if it is not an empty string, false otherwise, e.g.
(s)
(sarray[4])
When combined with conditional operators, the appropriate evaluation will be made when comparing 2 string values, e.g.
(s == 'abc')
(s != 'abc')
(s > 'abc')
(s >= 'abc')
(s < 'abc')
(s <= 'abc')
The <, <=, >, >= operators perform lexical comparisons.
By default, string comparisons are case-insensitive, i.e. ('abc' == 'ABC') will yield a true value, but by appending a * character to the operator a test can be made case-sensitive, e.g.
(s ==* 'abc')
The equality operators == and != can be turned into wildcard comparisons by appending a %. The right-hand expression will be assumed wild, e.g.
(s ==% '*a*')
This will be evaluated to true if s contains 'a' or 'A'. Similar to non-wildcarding, the appending of a * will make a test case-sensitive, e.g.
(s ==%* '*a*')
A point value used in isolation will be evaluated as true if it is not (0,0,0), false otherwise, e.g.
(pt)
(ptarray[4])
When combined with conditional operators, the appropriate evaluation will be made when comparing 2 point values, e.g.
(pt == (10,20,30))
(pt != (10,20,30))
(pt > (10,20,30))
(pt >= (10,20,30))
(pt < (10,20,30))
(pt <= (10,20,30))
The <, <=, >, >= operators return true if testing any of the x,y,z components of the point values yields true, e.g.
(pt1 > pt2)
This is equivalent to:
(pt1.x > pt2.x || pt1.y > pt2.y || pt1.z > pt2.z)
Note:In a similar fashion to numeric tests, point tests for equality are made to a number of decimal places. This by default is 4, but can be set via the system numeric identifier cond_precision.
A time value used in isolation will be evaluated as true if it is null, i.e. undefined, false otherwise, e.g.
(t)
(tarray[4])
When combined with conditional operators, the appropriate temporal evaluation will be made when comparing 2 time values, e.g.
(t == '11-Sep-2001')
(t != '11-Sep-2001')
(t > '11-Sep-2001')
(t >= '11-Sep-2001')
(t < '11-Sep-2001')
(t <= '11-Sep-2001')
Most other Fire identifier types can be only be used within conditional expressions to test for equality with other objects of the same type.
Testing for equality between epointer identifiers returns true if 2
epointers refer to the same graphic primitive.
Testing for equality between window or channel identifiers returns true if both
objects refer to the same window or channel slot.
Testing for equality between symbology identifiers returns true if both
symbologies refer to the same object
Validity checks, e.g. if (object) ..., usually entail comparing an identifier's value with null.
Currently there is no way of comparing user types (structures etc.) for equality or validity.
In a similar way to other languages, conditions can be combined :
( condition && condition )
true if both conditions are true
( condition || condition )
true if at least one condition is true
( condition ^ condition )
true if one and only one condition is true
Care should be taken when combining conditions since the operators &, | and ~ are also used within the language in certain string and point expressions. When such conflictions arise, sub-conditions can be further enclosed within parentheses, e.g.
if ((p1 = p0) && (p2 = p0)) ...
As well as testing relationships between scalar values, the language has facilities for testing arrays of values. When comparing arrays, the comparison test is performed on each array element in turn and a true value is only returned when all element comparisons satisfy the condition.
Consider the following sequence:
numeric xa[4] = <100,200,300,400>
    if (xa == <100,200,300,400>) !The condition is true
    if (xa[2:3] == <200,300> !The condition is true
}
As we mentioned already, for the whole condition to be true, all elements must satisfy the condition, i.e. there is an implicit && between elements. This is the case when the condition operator is ==, <, <=, > or >=. However, when the operator is !=, then the condition is true if at least 1 element satisfies the inequality condition.
Such testing of arrays is permitted on all identifier types for which scalar conditions are permitted.
If there are fewer values on the right-hand side of the operator than on the left, the last value of the right-hand list is re-used, e.g.
if (xa[1:2] > 0) ...
This tests if both elements of xa are greater than zero.
Arrays can be tested for multiple non-null values. The following test will be true only if all array elements are non-zero, e.g.
numeric xa[4]
if (xa) !All elements are non-zero
This does not produce the same result as (xa != 0).
A common requirement is to determine whether one or more values occur within a discrete set of test values. There are 2 operators for this, =| and =&.Consider this test:
if (x =| <1,37,92,135>) ...
This will be true if x has the value 1, 37, 92 or 135. It is equivalent to but executes faster than:
if (x == 1 || x == 37 || x == 92 || x == 135) ...
We could also have used =& as the operator, since when the left-hand-side of the test is a scalar, they are equivalent. Only when the left-hand side is an array do they differ in functionality. Consider this:
numeric xa[]= <5,37,91>
if (xa =| <1,37,92,135>) !This will be true
if (xa =& <1,37,92,135>) !This will be false
The first if statement (=|) tests for at least one
of the left-hand side values occurring in the array of test values on the right.
It is evaluated as true .
In contrast, the second statement (=&) tests whether all left-hand
side values occur in the right-hand test values. In our case they don't, so
it is evaluated as false.
When testing occurrences on string values, the *(case-sensitive) and/or %(wild-card) characters may be appended to the operator, e.g.
string test[]= <'a*','b*','z*'>
if (mystring =|*% test) !True if mystring starts with a,b or z
Another common requirement is to determine whether one or more values fall within a range relevant for the identifier type being tested. There are a few operators available, each begins with < and ends with >.Consider this test:
if (x <|> <500,1500>) ...
This will be true if x has a value between 500 and 1500 exclusive. It is equivalent to but executes much faster than:
if (x > 1 && x < 1500) ...
Also available are <=|> , <|=> and <=|=> for tests inclusive of the first or second range values. The right-hand side of a range test must contain 2 values, or be a 2-element array.
We could also have used <&> as the operator, since when the left-hand-side of the test is a scalar, they are equivalent. Only when the left-hand side is an array do they differ in functionality. Consider this:
numeric xa[]= <5,37,100>
if (xa <=|=> <10,100>) !This will be true
if (xa <=&=> <10,100>) !This will be false
The first if statement (<=|=>) tests for at
least one of the left-hand side values being within the range on the right.
It is evaluated as true .
In contrast, the second statement (<=&=>) tests whether all
left-hand side values are within range. In our case they are not, so it is evaluated
as false.
In a similar fashion to occurrence tests, range test operators relating to string values may be appended with a *(case-sensitive) and/or %(wild-card) character.
Range tests for point identifiers permit a locus to be used rather than 2 limit values, e.g.
if (pt <|> mypoly.origin:500) ...
This will evaluate to true if the point pt is within a distance 500 of the origin of a polygon entity mypoly.