This is a brief discussion showing how Fire can access .NET components. In this example we will use C# for building the .NET component for Fire to use.
There are many ways for unmanaged code to use/consume managed APIs. In the case of Fire interoperability, the solution is to use COM Callable Wrappers or CCW, .NETs solution for interoperating between .NET and COM environments. Remember, Fire can act as a COM (or OLE in the old world) component consumer via the oleobj function.
There are a number of guidelines that must be followed if you intend to expose .NET assemblies to COM applications:
Further details on these issues can be found in the references at the end of this section.
So the first thing we do is define (or modify as the case may be) the interface detailing what we want to expose. COM Interop can create an interface automatically, but defining explicitly allows complete control over what is and isn't exposed as well as benefits regarding versioning. In the example, the interface simply consists of 6 member methods, all returning various basic types. Two methods, getString and getImage also take an input argument of type String.
using System;
using System.Runtime.InteropServices;

namespace Xmarc {
   public interface IDotNetServer {
      int    getint();
      long   getlong();
      float  getfloat();
      double getdouble();
      String getString(String name);

      [ComVisible(false)]
      byte[] getImage(String name);
   }
}
Notice the line above the getImage method: [ComVisible(false)]. This is one of many COM Interop attributes that can be applied within managed code in order to "tweak" the generated TypeLibrary metadata. The various attributes are located in the System.Runtime.InteropServices namespace. By default all managed, public types are visible, so we have explicitly stated to the COM Interop that we don't want to allow any COM client the ability to access the getImage method. This ComVisible attribute can be applied to an individual type, member/property of a type or to an entire assembly to control COM visibility.
The code shown below implements the IDotNetServer interface. The code is simple and does not require much explaining except for the line [ClassInterface(ClassInterfaceType.None)] above the class definition. This attribute is used to alter the COM interface type that is generated by the COM Interop layer. By default, COM Interop generates a dispatch-only interface for each class you export to a type library. Using an auto-generated class interface, instead of explicitly defining your own, can complicate future versioning of your managed class(es). In our case, the setting for the ClassInterface attribute is ClassInterfaceType.None indicating that no class interface is to be generated (this is the only way to expose functionality through interfaces implemented explicitly by the class). Now COM clients (Fire in our case) can only access the DotNetServer class through the IDotNetServer interface.
using System;
using System.IO;
using System.Runtime.InteropServices;

namespace Xmarc {
   [ClassInterface(ClassInterfaceType.None)]
   public class DotNetServer : IDotNetServer {
      public DotNetServer() { }

      public int getint() {
         int i = 42;
         return i;
      }

      public long getlong() {
         long i = 42;
         return i;
      }

      public float getfloat() {
         float i = float.MaxValue;
         return i;
      }

      public double getdouble() {
         double i = Double.MaxValue;
         return i;
      }

      public string getString(String name) {
         String temp = "Your string \"" + name + "\" is " + name.Length + " characters long.";
         return temp;
      }

      public byte[] getImage(String name) {
         FileInfo fi = new FileInfo(name);
         int l = (int)fi.Length;
         byte[] buf = new byte[l];
         Stream ins = fi.OpenRead();
         BufferedStream bis = new BufferedStream(ins);
         int br = bis.Read(buf, 0, l);
         bis.Close();
         return buf;
      }
   }
}
We now build the class into a dll assembly. In Visual Studio, a new Visual C# project using the "Class Library" project template was created. The build output will be a DLL-based assembly.
Note that the .NET framework does not depend on the Registry and uses metadata (within assemblies) for this information. Consequently we need to generate COM-compatible registry entries for our managed C# assembly so the COM runtime can instantiate our server. Depending on what version of Visual Studio being used, various project settings can be edited in order to make the DLL COM viewable and automatically added to the Registry as part of the build process. Otherwise the regasm.exe tool (part of the .NET SDK) can be used to generate the COM typelibrary and registry entries.
Assuming our DLL is called XDotNetServer.dll, then the following Windows program can be used:
regasm XDotNetServer.dll /tlb
At this point, the COM registry entries would have been created. For the machine on which this was built, the entries looked like:
Shown below are the contents of the generated TypeLibrary. As expected, the only interface exposed by the COM object is the IDotNetServer interface. Note that the method getImage() is not part of the COM interface (since we added the ComVisible(false) attribute). Also note the return type of getlong() - a 64 bit integer.
 // Generated .IDL file (by the OLE/COM Object Viewer)
//
// typelib filename: XDotNetServer.tlb
[
   uuid(8F1B70E6-8586-4842-BF91-9773B0037A91),
   version(1.0),
   helpstring(".NET/Fire Interoperability Test"),
   custom(90883F05-3D28-11D2-8F17-00A0C9A6186D, XDotNetServer, Version=1.0.0.0, Culture=neutral, PublicKeyToken=null)
]
library XDotNetServer {
   // TLib : mscorlib.dll : {BED7F4EA-1A96-11D2-8F08-00A0C9A6186D}
   importlib("mscorlib.tlb");
   // TLib : OLE Automation : {00020430-0000-0000-C000-000000000046}
   importlib("STDOLE2.TLB");
   // Forward declare all types defined in this typelib
   interface IDotNetServer;
   [
      odl,
      uuid(C8301F68-D863-3A41-B7AA-A99F14B745DB),
      version(1.0),
      dual,
      oleautomation,
      custom(0F21F359-AB84-41E8-9A78-36D110E6D2F9, Xmarc.IDotNetServer)
   ]
   interface IDotNetServer : IDispatch {
      [id(0x60020000)]
      HRESULT getint([out, retval] long* pRetVal);
      [id(0x60020001)]
      HRESULT getlong([out, retval] int64* pRetVal);
      [id(0x60020002)]
      HRESULT getfloat([out, retval] single* pRetVal);
      [id(0x60020003)]
      HRESULT getdouble([out, retval] double* pRetVal);
      [id(0x60020004)]
      HRESULT getString(
         [in] BSTR name,
         [out, retval] BSTR* pRetVal);
   };
   [
   uuid(37C7CADB-2B5F-35CB-9B5C-21219523ACD0),
   version(1.0),
   custom(0F21F359-AB84-41E8-9A78-36D110E6D2F9, Xmarc.DotNetServer)
   ]
   coclass DotNetServer {
      interface _Object;
      [default] interface IDotNetServer;
   }
}
Right, so now the .NET assembly should be accessible by any COM client, such as Fire for example. Below is a screen shot of a Fire monitor window showing various commands used to create and access an instance of the DotNetServer object.
If you look closely at the listing of Fire's view of the DotNetServer (COM) object, you will notice that there is no getlong() method. Fire does not yet support 64-bit integers and therefore ignores the method altogether.
For brevity, the Fire commands used are as follows:
component c = oleobj("Xmarc.DotNetServer")
string t = ".Net/Fire Interoperability Test"
string s = c.getString(t)
tell s
Your string ".Net/Fire Interoperability Test" is 31 characters long.
numeric d = c.getdouble()
tell d
1.797693e+308
First we instantiate the COM object (as far as Fire is concerned) via the oleobj function passing in the name which includes the C# namespace qualifier we used in the C# code: Xmarc.DotNetServer. We then pass a Fire string variable to the object's getString method and then echo the return value which is also a Fire string. We follow that with a simple call to the object's getdouble method which simply returns the maximum value that a type of double can take.
We now have unmanaged code (Fire) talking to managed code via COM Interop.
Events in C# are implemented with delegates. The publishing class defines the delegate(s) that the subscribing class must implement. When the event is raised, the subscribing class's methods are invoked via the delegate(s). When the subscribing class (the sink) is actually a COM client , as in the case of Fire, the publishing class (the source) must include additional source-code elements in order to correctly simulate connection points. Connection points are what establishes two-way communications between clients and servers in the COM (unmanaged) world.
It is assumed that the reader is familiar with C# programming and .NET controls.
In addition to the above guidelines for building a .NET assembly, the following steps need to be followed in order for the .NET assembly events to be successfully seen and consumed by Fire (the COM client):
Further information can be found in the references at the end of this section.
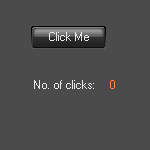
The first thing to do is define the required event(s) to Fire. For this example we are building a simple visual control that contains a button and label (static text). See below.
Since a button is an interactive control, we want to expose the fact that the button has been pressed. We also want to pass some additional information to objects receiving the event notification. For our case, the number of times the button has been pressed (an integer type) will suffice. For more complicated cases, the additional information will need to be encapsulated into its own class. By convention, these classes should be derived from System.EventArgs.
[ComVisible(false)]
public delegate void ClickHandler(int c);

[InterfaceType(ComInterfaceType.InterfaceIsIDispatch)]
public interface IClickerEvents {
   [DispId(123)]
   void Clicked(int c);
}
The code snippet above defines IClickerEvents as an event sink interface. The interface consists of single method, Clicked, which takes 1 argument of type int. We inform the runtime via the InterfaceType attribute, that this interface is to be exposed to COM as a dispinterface, which enables late binding only. We also explicitly specify a dispatch ID via the DispID attribute. Note: Distpatch interfaces in unmanaged COM have a default member (DISP_VALUE or 0) that is called in the absence of a specified DISPID. The .NET Framework cannot reference a default method or property.
In addition to the event, the .NET control also exposes two methods that may be called by subscribing classes:
public interface IXDotNetControl {
   int getClickCount();
   String getClickMessage();
}
Shown below is the class Clicker which implements the .NET button control:
[ComSourceInterfaces(typeof(IClickerEvents))]
[ClassInterface(ClassInterfaceType.None)]
[ProgId("XDotNetControl.Clicker")]
public partial class Clicker : UserControl, IXDotNetControl {
   public event ClickHandler Clicked;
   private int clickCount;

   public Clicker() {
      InitializeComponent();
      clickCountLabel.Text = clickCount.ToString();
   }

   private void button1_Click(object sender, EventArgs e) {
      ++clickCount;
      OnClickEvent();
   }

   public void OnClickEvent() {
      ClickHandler temp = Clicked;
      if (temp != null)
         temp(clickCount);
      clickCountLabel.Text = clickCount.ToString();
   }

   public int getClickCount() {
      return clickCount;
   }

   public String getClickMessage() {
      return "Button has been pressed " + clickCount + " times.";
   }
}
We connect the event interface to the Clicker class via the ComSourceInterfaces attribute, passing in the type of the event source interface. The ClassInterface attribute is added (see the discussion in previous sections). We then define the event member using the C# keyword event. Remember, the class event name and the interface method name must be the same. The event name is therefore called Clicked.
The next step is to define a method responsible for raising the event. For our example, OnClickEvent is called when the button itself is pressed. Note, button1_Click is called when the UI (the UserControl) receives a button press event. Notice that OnClickEvent defines a temporary local variable called temp which is initialized to the event member itself. Next, it is compared to null. If it is found not to be null, it will be used to raise the event. The temporary variable is used in order to prevent a possible thread synchronization issue. If Clicked is referred to directly, it is sometimes possible that the thread would see that Clicked is not null, but then just before raising the event (calling Clicked), another thread could cause it to become null, thereby resulting in a NullReferenceException. OnClickEvent then updates the label (static text) to reflect the number of times the button has been pressed.
The Clicker class then provides implementations for the 2 methods that make up the exposed COM methods, defined in IXDotNetControl.
The full code listing also contains additional code (between the #region and #endregion sections) that allows the .NET control to appear as a COM control. This is used by the runtime when the assembly is registered/unregistered. This is not needed for the example to work however.
using System;
using System.Collections.Generic;
using System.ComponentModel;
using System.Drawing;
using System.Data;
using System.Text;
using System.Windows.Forms;
using System.Runtime.InteropServices;
using Microsoft.Win32;

namespace XDotNetControl {

   [ComVisible(false)]
   public delegate void ClickHandler(int c);

   [InterfaceType(ComInterfaceType.InterfaceIsIDispatch)]
   public interface IClickerEvents {
      [DispId(123)]
      void Clicked(int c);
   }

   public interface IXDotNetControl {
      int getClickCount();
      String getClickMessage();
   }

   [ComSourceInterfaces(typeof(IClickerEvents))]
   [ClassInterface(ClassInterfaceType.None)]
   [ProgId("XDotNetControl.Clicker")]
   public partial class Clicker : UserControl, IXDotNetControl {
      public event ClickHandler Clicked;
      private int clickCount;

      public Clicker() {
         InitializeComponent();
         clickCountLabel.Text = clickCount.ToString();
      }

      private void button1_Click(object sender, EventArgs e) {
         ++clickCount;
         OnClickEvent();
      }

      public void OnClickEvent() {
         ClickHandler temp = Clicked;
         if (temp != null)
            temp(clickCount);
         clickCountLabel.Text = clickCount.ToString();
      }

      public int getClickCount() {
         return clickCount;
      }

      public String getClickMessage() {
         return "Button has been pressed " + clickCount + " times.";
      }

      #region Additional COM registration registry keys so this appears as a ActiveX control.
      [ComRegisterFunction]
      static void ComRegister(Type t) {
         string keyName = @"CLSID\" + t.GUID.ToString("B");
         using (RegistryKey key = Registry.ClassesRoot.OpenSubKey(keyName, true)) {
            key.CreateSubKey("Control").Close();
            using (RegistryKey subkey = key.CreateSubKey("MiscStatus")) {
               subkey.SetValue("", "131457");
            }
            using (RegistryKey subkey = key.CreateSubKey("TypeLib")) {
               Guid libid = Marshal.GetTypeLibGuidForAssembly(t.Assembly);
               subkey.SetValue("", libid.ToString("B"));
            }
            using (RegistryKey subkey = key.CreateSubKey("Version")) {
               Version ver = t.Assembly.GetName().Version;
               string version = string.Format("{0}.{1}", ver.Major, ver.Minor);
               if (version == "0.0")
                  version = "1.0";
               subkey.SetValue("", version);
            }
         }
      }

      [ComUnregisterFunction]
      static void ComUnregister(Type t) {
         // Delete entire CLSID\{clsid} subtree
         string keyName = @"CLSID\" + t.GUID.ToString("B");
         Registry.ClassesRoot.DeleteSubKeyTree(keyName);
      }
      #endregion
   }
}
We now build the class into a dll assembly. In Visual Studio, a new Visual C# project using the "Class Library" project template was created. The build output will be a DLL-based assembly.
As discussed in the previous sections, we need to generate COM-compatible registry entries for our managed C# assembly so the COM runtime can instantiate our server. Depending on what version of Visual Studio being used, various project settings can be edited in order to make the DLL COM viewable and automatically added to the registry as part of the build process. Otherwise the regasm.exe tool (part of the .NET SDK) can be used to generate the COM typelibrary and registry entries.
At this stage our .Net Clicker control should be accessible as an OLE control. Open up OleViewer (supplied as part of Visual Studio SDK). Under Object Classes --> Grouped by Component Category --> .Net Category you should see an entry for XDotNetControl.Clicker. If the code in the #region/#endregion block was included, you will also see XDotNetControl.Clicker listed under the Controls node.
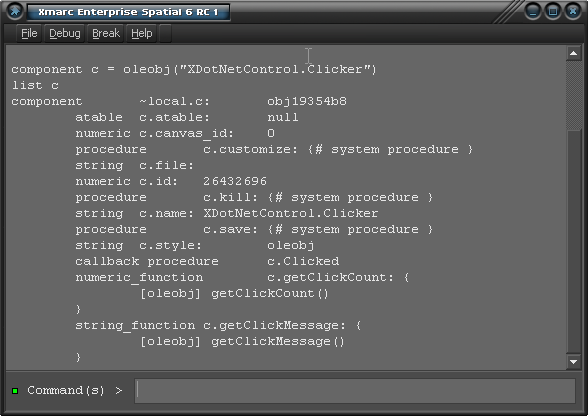
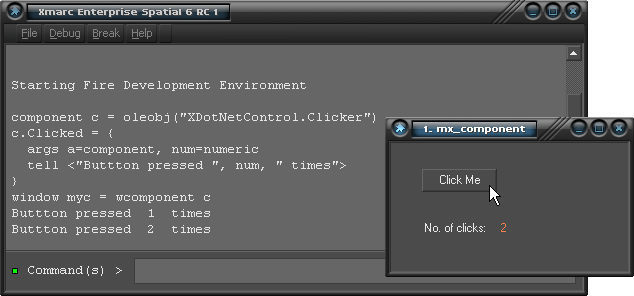
Now the .NET assembly should be accessible by any COM client including Fire. Below is a screen shot of a Fire monitor window showing various commands used to create and access an instance of the XDotNetControl.Clicker object.
If you look closely at the listing of Fire's view of the XDotNetConltrol.Clicker (COM) object, Fire has automatically detected the event exposed by the .NET control and has created a callback method of the same name: c.Clicked. Note however that the listing does not inform the Fire macro programmer that Clicked takes an argument of type int (this will be rectified in later versions of Fire). The macro programmer should refer to the type-library of the control for a complete definition.
Since we implemented the control, we know that the event takes a single arguement of type int. In Fire, we can therefore code the callback as follows:
component c = oleobj("XDotNetControl.Clicker")
c.Clicked = {
   args a=component, num=numeric
   tell <"Buttton pressed ", num, " times">
}
Note: Fire always passes the component itself as the first argument to callback methods. We therefore add a second argument of type numeric for access to the click count passed by the event mechanism.
We can now run the following Fire command to display the control within a Fire window:
window myw = wcomponent c
Try clicking the button. On every click, Fire will be notified of the event via the callback and you should see a message appear in the monitor window for each click.
We now have unmanaged code (Fire) catching events via COM Interop.